Basing Wargame Miniatures
Diorama Figure Stands in 1:72 Scale

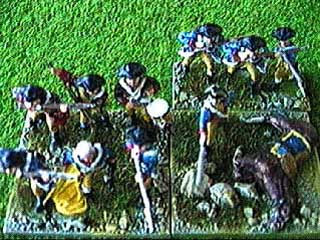
Matchbox NATO Paratroopers based for Crossfire skirmish rules. The miniatures are mounted on a rectangular cardboard base covered with sand and small stones, painted olive green, and drybrushed in khaki and white to bring out the texture. The rocky ground in the center of the stand has been covered with static grass and a small bush made from lichen. After the painting, figures may be pried off their wooden painting handle or ruler, using a small screwdriver. Don’t worry if some paint chips off a figure’s base, because the damage will be corrected when we paint the miniature diorama base.
Tools and Accessories
- 3 mm Plywood
- X-ACTO Knife with Scalpelblades № 11
- Large Geometric Triangle
- Medium Sandpaper
- PVA white glue
- Sand, Small Stones and Lichen
- Old Broadheaded Brush for Drybrushing
- Plaka Posterpaint or Acrylic Paint
- Static Grass and Applicator, NOCH
Figures should be based on 3 mm plywood which will not warp as easily as cardboard and balsa. If you want to use the diorama-bases for gaming, it is a good idea to cut them in standardized wargame base sizes or multiples thereof. We recommend the following base sizes which are compatible with Volley & Bayonet and upscaled versions of Complete Brigadier, Fire and Fury and a number of other rule sets where cavalry and infantry subunits of different strengths are based on the same base frontage:
- Infantry regiment of 10–12 Figures: 76 mm wide × 38 mm deep
- Infantry brigade of 12–16 Figures: 76 mm wide × 76 mm deep
- Light infantry battalion of 2–3 Figures: 38 mm wide × 38 mm deep
- Field artillery battalion, 1 Gun and 3 Figures: 38 mm wide × 76 mm deep
- Heavy artillery battalion, 1 Gun and 4 Figures: 38 mm wide × 76 mm deep
- Light cavalry regiment of 2–3 Figures: 38 mm wide × 76 mm deep
- Cavalry brigade of 5 Figures: 76 mm wide × 76 mm deep
- Division or Corps Commander, 2–3 Officers: 38 mm wide × 38 mm deep
- Army Commander, 3–4 Officers: 50 mm wide × 50 mm deep
Alternatively, individual figures mounted on steel bases may be deployed on unit-sized stands made of or lined with magnetic sheet.
Infantry Regiment or Brigade
The decision to mount infantry on regimental or brigade sized bases depends on the historical period and the tactical doctrine employed by the army.
- 1700–1788 infantry fights in regimental formation
- 1789: French infantry changes to brigade formation
- 1805: Austrian Grenadiers change to brigade formation
- 1806: French allies change to brigade formation
- 1808: Prussian infantry changes to brigade formation
- 1809: Austrian and Russian infantry changes to brigade formation
- 1812: British and Allied infantry changes to brigade formation
Infantry brigades may also be formed by placing one regiment behind the other and manœuvring them as one unit. This is particularly useful in the case of British and Allied infantry which converts to the brigade formation only as late as 1812. Between 1810 and 1815 there are no significant uniform changes to warrant painting the British army twice, one version based on regimental and the other on brigade stands. Regimental bases offer less space for diorama landscaping than the larger brigade bases, but a regimental army does make up for it with an attractive display of extended lines of troops.
Cavalry Regiment or Brigade
Light cavalry, Hussars, Chevaulegers, Uhlans, Cossacks and Light Dragoons are usually mounted on 38 × 76 mm cavalry regimental bases. Two regiments placed adjacent to each other form a brigade of cavalry, with the exception of Cossacks, who always fight as skirmish light cavalry. Medium and heavy cavalry, Dragoons, Carbineers and Cuirassiers are mounted on brigade bases.
Cutting the Bases
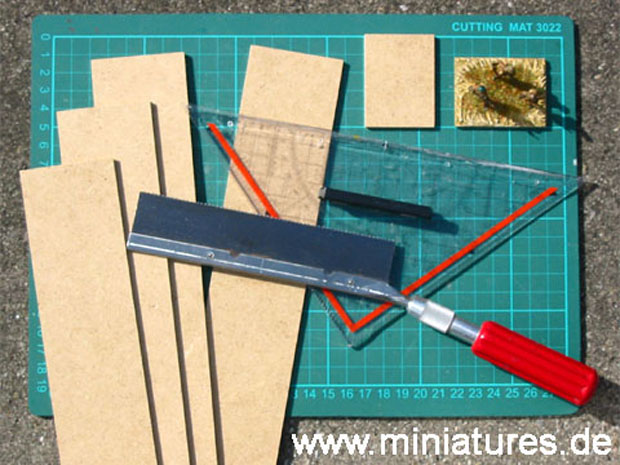
Building supply stores usually offer to cut the plywood or HDF board into strips of 76 mm width, from which we can easily cut the required bases. Using the geometric triangle, measure the base depth and mark the intended cut with a sharp scalpel knife. Do not use excessive pressure, the blade may break, resulting in serious injury. It is impossible to slice through the plywood with one cut anyway, repeated cuts are required. Rest the plywood on a cutting board and use several careful cuts with the scalpel to work through the layers of the wood. This will ensure a clean cut that needs very little sanding along the edges. Always cut away from your hands and body,to avoid injury!
When you are cutting 76 × 38 mm bases, it is very important that the grain of the wood runs parallel to the long side, i.e. the front of an infantry base or the side of a cavalry regimental bases. You may have to cut a 76 × 76 mm base from the strip of wood first and cut that in half along the grain. If the grain is not parallel to the long side, the base will warp when white glue is applied to it. In the event that a base warps, the effect can sometimes be reversed by immediately brushing clean water on the underside of the base. It is very difficult to control the warp and counterwarp, better to cut the grain correctly and prevent the problem right from the start. When figures are mounted on 76 × 76 mm bases, the grain should always run parallel to the front of the unit.
Naming the Unit
Figures are usually painted in historically correct uniform and they take on a unique identity. However, not everyone who looks at the collection is necessarily familiar with regimental facings and other distinguishing features. Hence, it is a good idea to put nametags on the upperside of the base to facilitate unit recognition. It is nearly impossible to add nametags after the base has been covered with sand, such work has to be done in advance.
An area 8-10 mm deep and up to 55 mm wide in the rear of the figures is usually enough to accept a small nametag with one or two lines of text. If you own a computer, you can use a text or desktop publishing program to print regimental names on regular typing paper. Using an old German font like Fraktur, Old English or Russian characters can look very much in period for regiments from these nations.
Any 6 point font will be large enough to read, and it’s small enough to blend in well with the base. Diluted acrylic paint can be used to dye the nametag in the olive green ground colour which will later be applied to the entire base. When it is dry, the tag can be cut out, leaving an irregular 3 mm margin around the front and sides, which can later be hidden with sand. The rear of the tag should be flush with the rear edge of the base.
Before you name the regiment, make sure you’ve got the spelling right, including any special French, Swedish, Danish, Russian and German characters. Creative spelling like 42nd Highländers, 7th U.S. Calvary, Irisch Brigade, Generals Börnside and Kuster, can be fun, but it looks out of place on an otherwise historic battlefield.
Some German terms that are routinely misspelled by Anglo-American military authors are Leib-Regiment or Leib-Garde (Life Guards), Leib-Fahne (Colonel’s Colours), and Frei-Regiment or Frei-Korps (literally a Free-Regiment of volunteers). The common misspelling of "Lieb-Regiment" is particularly silly, because it changes the meaning to "lovely, nice, or cute regiment", not usually a desirabel attribute for a tough regiment of guards.
If you remember that the German "ei" is pronounced exactly like the English "i", you’ll have no difficulty pronouncing "fry-coa" and "lyb-gaa-da" correctly. The less you roll your Rs, the more German it will sound. Another valuable trick is to pronounce the German "ch" like the English "sh". Doing so will compel your vocal apparatus to pronounce Blücher like "Blü-sher" instead of the incorrect "Blooker" so often heard around Anglo-American gaming tables. The closest English equivalent to the German "ü" is in the word "nymph", "ö" can be found in "turn", and "ä" is in "labor".
Commanders like Bärnklau, Möllendorf, Bülow, Lützow, and many others have their names spelled with ä, ö or ü Umlaut characters that are readily available on your PC compatible or Macintosh computer. If you don’t know where the Umlauts go, don’t guess, look them up. This editor has seen product catalogs listing the Sturmpanzer IV (Brummbär) spelled "Brümmbar" for no other reason than bad guesswork. One wonders if the vehicle model is researched and designed in the same haphazard fashion. Don’t trust wargame rule writers or scenario designers to get the spelling right either. If you care about your army, corps and division commanders, double-check their names in the New Columbia Encyclopedia. You’ll find the proper spelling, including first and middle names as well as aristocractic titles, and you’ll avoid embarrasing mistakes that are difficult to correct later.
Preparing the Terrain
Before figures are actually mounted with glue, the proper positioning should be tested on another base of the same size. When a realistic looking set-up has been found, the base with the correct nametag can be covered with glue, placed in front of the test base, and the figures transferred one at a time, maintaining the previously chosen alignment and relative positions. As soon as all figures are firmly placed in the glue, the base can be covered with a mixture of fine dry sand and small stones. Place the base into a shallow tray and let the sand flow between figures by lifting the tray at one end. To allow the sand to settle into the glue, knock your finger against the underside of the base a few times.
Because of the weight of the sand, figures may have shifted slightly. Check alignment and proper positioning again, before allowing the sand to dry. Never drop sand and stones onto the base from above. This may avoid shifting the figures, but they will get very dirty and it is difficult to remove the dust from the uniforms later.
Realistic scale terrain depends on the proper mixture of sand and stones. Kitty-litter makes good stones in this scale. If you like your bases to be very historical, sand from famous battlefields may be the answer. Mount your British troops on the ground of Minden or Waterloo, Prussians on the soil of Roßbach, Leuthen, Leipzig, Ligny or Plancenoit, base the French on the dirt of Jena, Austerlitz, Ulm or Marengo, and use sand from Borodino for the Russians. It is usually not a good idea to leave the sand unpainted, it just does not look right in this scale.
These Airfix figures from Washington’s Army are advancing across broken ground, the small stones and patches of static grass create a very pleasing, and realistic looking landscape.
Painting the Base
Leave the sand to dry overnight. The base may then be painted olive green, using Plaka posterpaint or acrylics, after which it needs to dry again for several hours. Drybrushing the base with khaki and a careful second layer of white will highlight the stones and other raised detail. It is impossible to avoid that some pigment will be drybrushed onto the boots of the figures, giving them a nice dusty look. Yellow paint may be carefully stippled between the rocks, creating the impression of small flowers and patches of moss. This is an important step in the detailing process, it adds interest to your bases.
To simulate dry ground, dark khaki may be used as an undercoat for the base, drybrushing and detailing it in a similar way to the above.
Use only old brushes to paint and drybrush the base. Sand is highly abbrasive and it will destroy paintbrushes very rapidly. Old and frayed brushes are ideal for this work.
Static Grass and Lichen
The crowning touch of any figure base is the application of static grass manufactured by NOCH and Heki. Static grass is available in seasonal colours, the green brown of late summer being the most useful for wargamers and figure collectors. It works equally well with olive green and dark khaki bases.
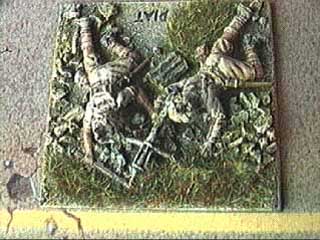
This Indian army PIAT anti-tank team is mounted on a semi-arid terrain tile. The WW2 wargame figures may be used anywhere in the Mediterranean theater. The loader is an ESCI 8th Army figure, the upper body of the PIAT gunner is from an ESCI British Infantry figure, with legs from ESCI’s 8th Army. Both men have the helmet replaced with a turban scrounged from Atlantic Indian Brigade figures.
Static grass is planted using the specifically designed applicator bottle from NOCH. For best results, the bottle should be half-full with static grass. Apply irregular patches of white glue to the base, place the base into a shoebox and spray gras onto the base from a height of 15 cm. Squeezing the plastic bottle repeatedly will eject small amounts of statically charged grass until the base is covered with a layer of approximately 5 mm of the grass material. Pick up the base, knock your finger against the bottom of it to make the grass settle into the glue, then shake off excess grass into the shoebox, to be used again later. Now comes the most important step of the process:
Blowing across the base lightly and from all directions, will make the static grass stand up like real grass. If this is not done, or the grass was not sprayed on with the plastic applicator bottle, the grass will not stand up. Patches of grass will lump together, sink into the glue, and take on the appearance of cut grass in a lawnmower. The glue will shine through the layer of grass and the base will be ruined. Do not use static grass unless you intend to apply it correctly. An alternative may be to cut patches of grass from model railway mats, but they are nearly impossible to apply, particularly between the deployed figures.