Squash Casting
1:72 Scale Modelling Techniques
There is a little-known technique for reproducing simple one-sided parts or molded on detail. It is called squash casting and is a much more powerful modelling technique than it may initially appear. It’s great for reproducing multiple copies of a small part or when transferring detail from one kit to another without destroying the first kit. It works best for molded on detail or when a part is one-sided (hinges, hatches, ventilators, etc..), however, you could use this technique to produce two ½ molds to be joined together. The best part of the technique is that the reproductions are created in plastic!
Tools and Materials
- Epoxy Putty
- Plastic Sprue
Making the Mold
Mix up two-part epoxy putty and set it aside until it’s no longer sticky, but still pliable (approximately 20-30 minutes). I use “Duro E-Poxy” ribbon, but other types of epoxy putty should work as well (e.g. “Milliput”, “Zimm-it-Rite”, etc.)
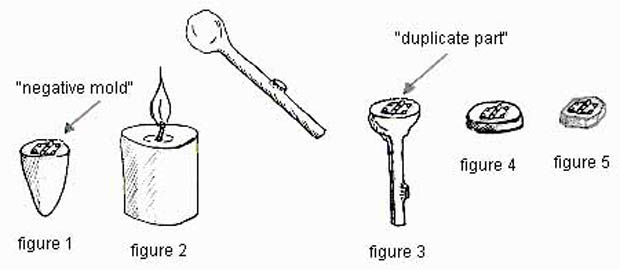
Roll the epoxy putty into a spherical or conical shape and hold it firmly between your index finger and thumb. Select the detail to be reproduced and squash the epoxy putty against it, creating a mold. Work it down well. Try to get a nice perpendicular angle of attack, otherwise you may distort the imprint. If the epoxy putty is no longer sticky, you may attempt to cautiously remove the epoxy putty in the reverse manner from which you originally squashed it against the detail. This creates a "negative" mold of the detail (figure 1). Often times, it’s easier to allow it to set-up overnight before removing.
I find that the combination of “Duro E-Poxy” putty, using an unwashed plastic kit (i.e. with a little bit of the leftover mold release residue from the manufacturer), and allowing the epoxy putty to set-up over night before removal (when all of the stickiness has subsided and the epoxy putty is almost fully hardened), seems to work best for me. Depending on the brand of epoxy putty that you use and how quickly you’d like to remove this epoxy putty mold, you may want to use a little bit of cooking spray or Vaseline (or almost any oily based substance) to prevent the epoxy putty from adhering to the detail when you try to remove it.
Using the Mold
When the mold is fully hardened, hold plastic sprue near a candle until one end forms a gooey blob (figure 2), but make sure that you have adequate ventilation at this step. Quickly squash this blob into the mold and hold for a few seconds until the plastic has fully hardened. Make sure that you use enough force to get the molten plastic into all areas of the mold. Remove the sprue from the mold and you will have a duplicate part contained on the sprue (figure 3).
You could deviate slightly at this step and use other materials such as epoxy putty or resin in place of the sprue if you really wanted to.
Cleaning the Casting
Snip the sprue and remove excess plastic from the underside until you have the required thickness to the part (figure 4).
Trim around the part until all of the excess plastic has been removed (figure 5) and you will be left with a duplicate than can be attached to your model with conventional plastic cement. I find emory boards and moto-tools (such as the Dremel) to be invaluable for cleaning up these duplicates. (The article originally appeared in Tracklink, used with permission).
Gray Creager