Wattle Fences in 1:72 Scale

Fences and field fortification made of flexible willow shoots are suitable for dioramas and wargames from the Mesolithic to our own times. See our tutorial: “How to Scratch-Build Wattle Fences”.
Modelling Materials
- 2 mm Wood or Plastic Base
- 0.8 mm Plastic Broom Bristles
- 0,4 mm Coconut Fibres
- Super Glue
- Wood Glue
- Sand and Flocking
Wattle Fences for Simulation Games
Building robust 1:72 scale wattle fences for wargames is remarkably simple: we use hand-carved beechwood fence posts or piano wire uprights (staves), and withies of fine copper wire. One advantage of wooden fence posts is that they can be glued directly to the base. Piano wire uprights or pins are inserted into a mounting strip made of balsa wood or cork. The fence can later be pulled out of the mounting strip and inserted directly into the diorama using the pins.
Modelling Materials
- 2 × 2 mm Beams as Foundation
- 1,5 × 1,5 mm Posts, ca. 15 mm high
- 0.4 mm Pins for Uprights
- 0.2 mm Copper Wire for Withies
- 10 × 115 mm Popsicle Sticks for Bases
- Wood Glue
- Sand and fine Gravel as Ground Cover

Wattle fences for wargames need a strong base to be structurally secure. Narrow popsicle sticks, often sold as craft sticks, are well-suited for this purpose. Using a craft knife, carefully chamfer the top edge of the popsicle stick all the way around, so that the ground rises gently towards the fence, rather than creating a noticeable curb.
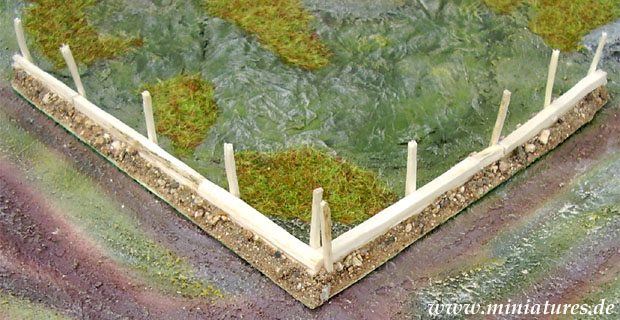
The foundation of the wattle fence is made from two layers of 2 x 2 mm thick beams, glued to the center of the 115 mm long popsicle stick with white glue. For a fence of this length, approximately 8.3 meters at a scale of 1:72, we use five fence posts. An odd number of posts is important so that the withies will later alternately wrap around the posts from the right and left. First, glue the two outer posts to the foundation, then place the third fence post roughly in the center of this fence section, and divide the two halves again with the second and fourth posts. It is visually appealing and looks more authentic if the post spacing varies slightly. Next, coat the base on both sides of the foundation with white glue and sprinkle it with a mixture of sand and small stones. The illustration shows a corner of the fence, made from two popsicle sticks joined at a 90-degree angle, after the ground cover has been added.
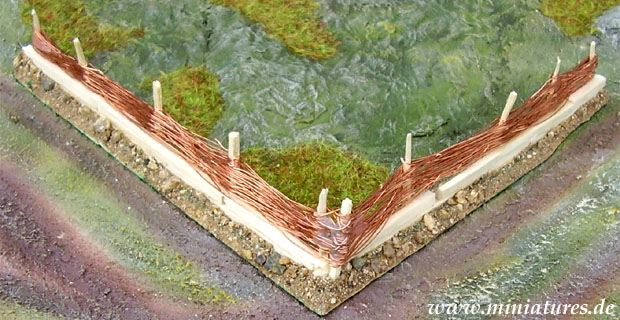
Once the fence has dried overnight and the posts are firmly in place, the weaving can begin. The end of the first strand of 0.2 mm copper wire is wrapped twice around the middle fence post, and then woven alternately around the next post on the left or right. The wire should lie flat against the fence post, but it must not exert so much tension on the outer posts that they break or bend excessively. The end of the first copper wire is secured to the nearest accessible post and then hidden between the already woven strands. We continue weaving further copper wires around the fence posts until the wattle fence reaches the desired height. Finally, we brush the woven strands with white glue to help the fence retain its shape, appear denser, and ensure better adhesion of the primer.

A completed wattle fence section after priming with artist acrylic paint.