Indian Infantry, 1940–1950
Miniatures Conversions in 1:72 Scale
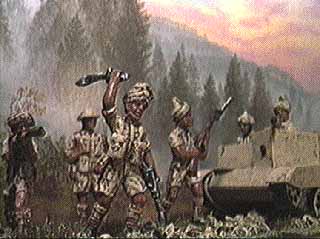
The picture shows an Atlantic Indian Brigade soldier with legs from ESCI 8th Army in the foreground. Left and right are Airfix 8th Army with turbans added. The soldier in the background is from Revell 8th Army, with no conversion. The Bren Carrier armoured vehicle was made from thin cardboard, with detail painted on. The driver and passenger are Atlantic figures cut off at the waist.
A very simple, yet versatile conversion. Over time, Airfix, ESCI, Matchbox, and Revell have published well over a dozen different sets of World-War Two plastic soldiers wearing British Battledress, with 1937 Pattern Web Equipment and standard British infantry weapons. Troops from the sets of British Infantry, British 8th Army Desert Rats, Commandos, Australian and New Zealand Army Corps may be deployed side by side after only minor conversion. This is possible, because the various styles of uniform with Battledress trousers or Khaki Drill Shorts, Khaki Drill Jackets, Battledress Blouses or Khaki Drill Tropical Shirts were worn concurrently in the North African and Mediterranean theater of operations.
Parts Required
- British Infantry, Airfix, ESCI
- British 8th Army, Airfix, ESCI, Revell
- Commandos, Airfix, ESCI, Matchbox
- Australian Infantry, Airfix, Revell
- Indian Brigade, Atlantic
- 0.3 mm and 0.6 mm Pianowire
Combat units typically display a surprising amount of variety in uniform styles and equipment. Frontline soldiers wear what they consider appropriate, very often in blatant disregard of army regulations. Accordingly, a platoon of Indian infantry may consist of one Lieutenant and 36 different soldiers, every one of them an original. Officer figures may even be converted from Japanese officers, replacing the Japanese field cap with a british style helmet, turban or service dress cap. The soldiers are easily converted by adding turbaned heads to any British infantry figure, only a few of the Indian soldiers will wear steel helmets.
Swapping Heads
Suitable heads for swapping may be scrounged from Indian Brigade figures by Atlantic as well as the Indian War “Kyber Pass” and Muslim Warriors sets published by ESCI. To convert any British or Australian figure, remove the head above the collar, insert a short pin cut from 0.3 mm pianowire and place the turbaned head upon it. The head may be permanently attached and any noticeable joints disguised by fusion welding the head to the collar with a soldering iron.
Standing and prone riflemen may have part of the right side of the face covered by the rifle butt, making the removal of the head a little more difficult. In the event that the head cannot be separated without damaging other parts of the figure, slice the helmet off carefully and replace it with a similarly cut turban. This is a much more difficult operation, and it can usually be avoided by careful study and planning of the cut that will remove the head cleanly. Otherwise, the top of the head and turban must be planed with the scalpel to ensure a proper fit. Insert a small peg cut from 0.3 mm pianowire, leaving only 2 mm length onto which the turban may be placed.
Switching Trousers
Variety of poses and uniform may be achieved very easily by swapping torsos and legs of many different miniatures. When using British infantry types, this operation is surprisingly easy, most cuts can be made along the beltline. Using the scalpel, pouches and other equipment must first be lifted off the trousers, allowing the items to remain attached to the torso when the figure is split in half.
Separate the figure halves by cutting along the lower edge of the belt. In the event that the figure needs to be cut above the waist-belt, any shoulderbelts will be cut and they may be difficult to align again on the joined figure. Once the figure is split, you will have a torso with all of the equipment attached to it and a pair of legs in plain trousers. Both pieces will be used for conversion.
Hold the separated parts of figures against each other, checking for attractive new poses that may be created. Conversion of standing to prone figures usually makes very striking poses, particularly when the weapon is carried diagonally in front of the body. Two halves of a figure may be attached to each other using a short pin cut from 0.6 mm pianowire. Weld the pieces together after joining.
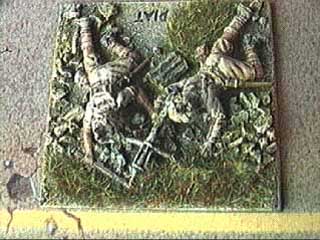
Prone riflemen are converted in the same way. The upper body of the PIAT gunner comes from an ESCI British infantryman, the legs are from ESCI 8th Army and the turban from Atlantic. In this particular case, the head was impossible to remove completely, and the turban had to be trimmed and fitted onto the existing head of the figure. Infantry in foxholes may be simulated by glueing a figure’s upper body onto a base and modelling the edges of the foxhole around him. The inside of the hole is painted matt black and the exposed parts of the figure detailed as usual.
Weapons and Special Equipment
Historically correct infantry units require a certain amount of heavy weapons and specialized equipment. These items are not always available in a particular figure set, but they can be scrounged from other units:
- 2″ Mortar, British Infantry, Revell
- 3″ Mortar, British and Australian Infantry, Matchbox
- Observer with binoculars, British 8th Army, Airfix
- Boys Anti-Tank Rifle, Siberian Rifles, Revell
- Bren LMG, British 8th Army, Airfix
- Bren LMG on tripod, British 8th Army, Revell
- Bren № 2 with ammo box, Australian Infantry, Revell
- Flamethrower, British Infantry, Matchbox
- Radio, Australian Infantry, Matchbox and Revell
- Minedetector, British 8th Army, Airfix
- PIAT, British Infantry, ESCI
- Vickers MMG, Australian Infantry, Matchbox and Revell
- Walkie-Talkie, British Infantry, Matchbox
To be used in an Indian infantry platoon, these figures only need to have the helmet replaced with a turbaned head. To create more variety, swap trousers and poses as outlined above.
Painting the Figures
The soldiers pictured above are dressed in Khaki Drill tropical uniforms which were also worn in other areas of the Mediterranean theater of operations:
- Umber undercoat
- Khaki drybrush
- Light khaki, almost white drybrush to highlight belts and ammo pouches
- Face, arms, legs, gaiters, canteen and rifle stained with burned umber
- Neutral Grey boots and metal fittings on rifle
- Silver drybrush on Bayonet
British and Commonwealth infantry may be converted and painted following these same guidelines. Uniform colours may differ, a drab uniform with khaki belts and pouches was worn in Northern Europe, and jungle green uniforms with green webbing were issued to troops in Burma and Malaysia. Allied forces wore a variety of standard issue and national headgear with their British style uniforms, the British “Tin Hat”, berets, side caps, General Service Caps, the Scottish Tam O’Shanter and Glengarry Cap, widebrimmed hats of the ANZAC forces and the white kepi of the French Foreign Legion.