Applying Winter Camouflage Paint Schemes on Small Scale Tanks and Military Vehicles
1:72 Scale Painting Techniques
In general, World War II white winter paint overcoats were applied with temporary paints or pastes. These overcoats were applied in various ways, using a spray gun, brush, broom, or rag, depending upon the resources of the vehicle’s crew. They were often applied on a dirty surface, and were subject to harsh weather conditions. Consequently, the temporary paints did not wear well, and soon began to rub off, revealing the original color of the vehicle, along with its dirt. Also, the white would mix with dirt causing it to turn a muddy color. In time, the winter painted tank would look quite motley with portions of the white worn or washed off, the underlying color revealed, and lots of dirt and streaky mud effects. It is very rewarding to duplicate this heavy weathering on a small armor model. It may sound difficult, but the effect is actually easy to achieve.
Tools and Accessories
- Airbrush
- Clear Gloss Varnish
- Clear Flat Varnish
- Acrylic or Enamel Paint
- Water-Colours
- Pastel Chalk
- Baking Soda
- Sandpaper
White Coat
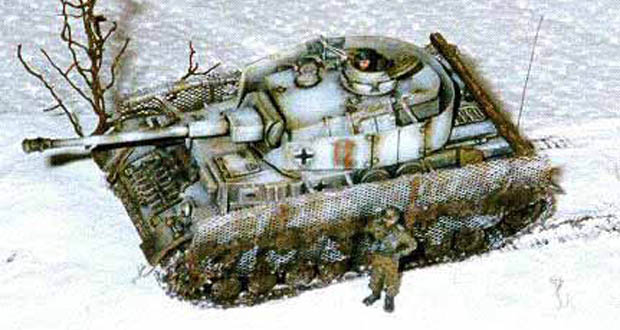
Start by painting the assembled model its primary base color. I use acrylic paints exclusively, but enamels should work as well, given the proper drying time between coats of paint. For this discussion, I will use my 1:72 ESCI Pz.Kpfw. IV as the example. I painted the model dark armor yellow and let it dry. With a brush, I glossed beneath where the decals go, applied the decals, and sealed them with another coat of gloss. Next, I mixed up some thin white water-colour paint, and sprayed 2 or 3 thin coats onto the model. You could also brush thin white acrylic or enamel as a substitute. At this point, have some fun and streak the water-colour with a wet paintbrush, remove it here and there – beat it up a little bit. You want some base color to show through. Also remove paint from the decals, just wipe it away, keeping close to the edge of the decal. When dry, the resulting white coat will be uneven, thin, and not very good looking. That’s ok, we’ll fix it later.
Dirt Wash
Now, if you used the water-colour, seal it with a coat of gloss or semi-gloss spray to prevent further wash off. Next, mix up some thin black/brown water-colour or acrylic wash and spray or brush it all over the model. Do not drown the model in it, but rather apply an even coat overall. When dry, the wash will have concentrated in recesses, panel lines, around hatches etc., but also the overall color of the model has been darkened or dirtied up. Now you can begin blending it all together with a selective drybrushing of the base yellow color on most raised details, and on those areas that would receive a lot of wear.
The model at this point looks about 30 % yellow, and 70 % dirty white. Now do the same thing with white on the drybrush, but now hit the areas between the raised details- flat plates, turret tops and sides, hatch tops, etc. You will get a brighter shade of white in an overall mottled pattern, with dirtier white surrounding it, and different shades of yellow nearby. The yellow and white drybrush steps may pickup some of the dark wash,if water-colour was used, and this will further break down the color and heighten the effect.
Lastly, if you wish, you may add an additional pure black wash by small brush to select details you really want to stand out. This super dark wash contrasts highly with the white drybrush layer, and really adds depth, although it goes beyond the confines of aerial perspective and enters the realm of artistic liscence. But if you like it, and it looks good, so much the better.
Frozen Mud
As to the wheels or trackwork, I like to make them a monotone dark earth color. The season is winter, and mud is going to be frozen rather than dried. You can make some easy mud by mixing baking soda, dark brown acrylic paint, and white glue. Spread it liberally on the lower portions of the model, on the wheels and trackwork. It will look a little dusty when dry, so overcoat it with a very thin mixture of clear gloss and black – just enough to make it look dark and moist, but not glossy.
Final Touches
At any point you may go back and repeat an earlier step. With my Pz.Kpfw. IV, I went through the whole process three times, adding more color each time, until I achieved the look I wanted, which is a very dark shadow effect. If you happen to obscure the decals at some point, you can always carefully sand over them with very fine (600) sandpaper and water until the paint is removed and the decals revealed (This is a great reason to gloss seal the decals. The gloss provides a tough layer that allows harsh treatment such as sanding).
Lastly, if there are any glossy areas left, remove them with a matte overcoat, or pastel chalk dust. Almost all gloss should have been removed by the drybrush steps. Finally, you may sparingly add rust color to the muffler, tow cables, and fender edges. In fact, I would like to suggest that you use real rust. Scrape some off of an old garden tool, add a drop of water to the powder and brush it on. When dry, it looks almost real!
When complete, your model should look very attractive, high in contrast, rich in weathering, very realistic. This paint scheme tells a more complex story; it suggests both the extremes of climate and the harsh living conditions that the fighting men had to endure.
Jim Gordon